
As a new student, understanding the nuances of lighting is pivotal in bringing your creations to life. Arnold, the industry-standard rendering engine integrated into Maya, offers powerful tools and capabilities for crafting stunning visuals through lighting.
In this beginner’s guide, we’ll delve into the fundamentals of Arnold lighting.
Understanding Arnold Lights:
Arnold provides a range of light types, each tailored to fulfill specific lighting requirements and achieve diverse visual effects within your scenes. Here are some of the primary Arnold lights you’ll encounter:
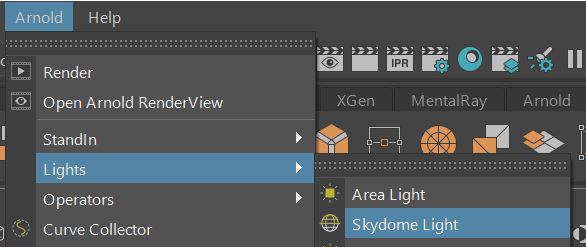
- Skydome Light: Simulates natural outdoor lighting by projecting an environment map onto a dome surrounding your scene. It is ideal for creating realistic outdoor atmospheres and reflections.
- Physical Sky: Generates a dynamic sky with realistic atmospheric effects such as sunlight, skylight, and atmospheric haze. It simplifies the process of creating outdoor lighting setups.
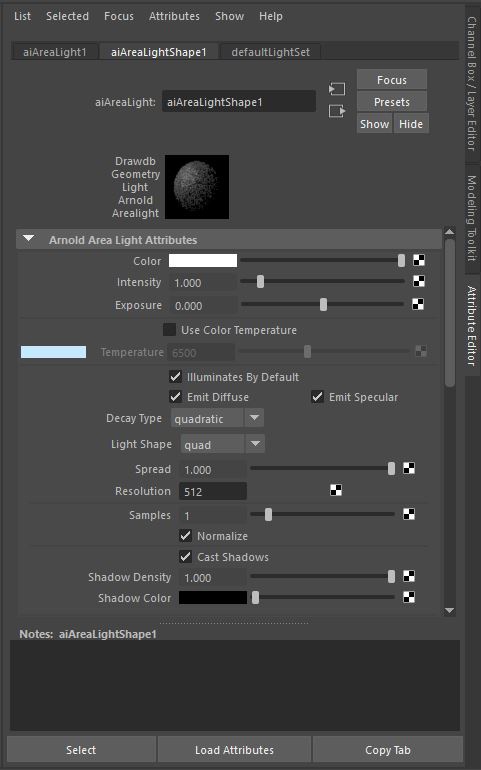
- Area Light: Emulates light emitted from a rectangular or circular surface, offering soft and even illumination. It’s suitable for replicating the lighting from windows, lamps, or overhead fixtures.
- Spot Light: Produces a focused beam of light within a specified cone angle, allowing for precise control over direction and falloff. It’s commonly used for highlighting specific objects or creating dramatic effects.
- Mesh Light: Turns geometry into a light source, enabling you to use objects within your scene as light emitters. It provides flexibility in creating custom lighting setups.

Setting Up Arnold Lighting in Maya:
To begin utilizing Arnold lighting in your Maya projects, follow these fundamental steps:
- Access the Arnold shelf in Maya or navigate to the Arnold menu in the main toolbar.
- Create the desired type of Arnold light by selecting it from the menu or shelf.
- Position the light in your scene using the move and rotate tools, considering the desired lighting effect.
- Adjust the light’s attributes in the Attribute Editor or Attribute Spreadsheet to fine-tune parameters such as intensity, color, and falloff.
- Experiment with multiple lights and their interactions to achieve the desired mood, atmosphere, and visual impact in your scene.
Tips for Effective Arnold Lighting:
- Familiarize yourself with Arnold’s Physical Sky and Skydome Light to create realistic outdoor environments with accurate lighting and atmospheric effects.
- Utilize Arnold’s extensive shader network to control how lights interact with materials, allowing for nuanced effects such as subsurface scattering and specular highlights.
- Take advantage of Arnold’s powerful rendering capabilities, such as global illumination and ray tracing, to achieve realistic lighting and shadowing without compromising performance.
- Explore Arnold’s light filters and AOVs (Arbitrary Output Variables) to refine and enhance your lighting during post-production compositing.
By understanding the various Arnold lights, setting up lighting in your scenes, and following best practices for effective lighting, you can bring your creations to life with depth, realism, and visual appeal.
A good place to start and experimenting is to light a maya scene using Three-Point lighting.
What is Three-Point Lighting ?
Have you ever wondered how movies, photos, or 3D animations look so vibrant and engaging? One big secret behind their visual appeal is something called “three-point lighting.”
Think of three-point lighting as a way to make things look their best in pictures or videos. It uses three different lights placed strategically around the subject you want to capture. Each light has a specific job:
- Key Light: This is the star of the show! The key light is like the sun – it shines the brightest and sets the mood. It’s usually placed to one side of the subject, giving it a nice glow and casting shadows in just the right places.
- Fill Light: Imagine the fill light as a friend helping out. It’s there to soften the shadows created by the key light. Placed on the opposite side of the key light, it brightens up those dark spots without stealing the spotlight.
- Backlight (or Rim Light): The backlight is like the magic touch. It goes behind the subject and adds a subtle halo effect. This light separates the subject from the background, making it pop and look more three-dimensional.
Setting Up Three-Point Lighting in Maya

If you’re working on a 3D project in Maya and want to make your scene look amazing, here’s a simple guide to set up three-point lighting:
- Create Spotlights: In Maya, go to Create > Lights > Spot Light to make your lights.
- Position the Lights: Place the key light at a 45-degree angle to one side of your subject. Put the fill light on the opposite side of the key light, and the backlight behind the subject.
- Adjust Settings: Play around with the intensity, color, and angle of each light until you’re happy with how it looks. Maya gives you lots of options to customize your lighting just the way you want.
- Preview and Adjust: Take a look at your scene in Maya’s viewport. If something doesn’t look right, don’t worry – just tweak the lights until it looks perfect.
- Render Your Scene: Once you’re satisfied with the lighting, hit the render button to see your masterpiece come to life!
Remember, three-point lighting is all about creativity. Don’t be afraid to try different setups and see what works best for your project.
